Useful Information for SL developers

We had the requirement to Create PO in Company 0075 from 0060 Company. Initially we decided to go for object model using StartApplication API function. We have achieved this requirement using SL object Model. By the way we can achieve this requirement using CallApplicWait & CallApplSetParmValue API functions.

For Instance: if SL is logged into Company 0060, I need to launch the Release IN Batches (10.400.00) screen in Company 0075 from one custom SDK.

Object Model:

Only way I can see this working is to use the StartApplication command, where the CpnyID can be defined when opening the screen.

New Feature in Dynamics SL:

We have to call the ApplSetParmValue API prior to CallApplicWait for launching Release IN Batches screen in Company 0075.

Call ApplSetParmValue (PRMSECTION_VBRDT, “COMPANY”, “0075”)

Call CallApplicWait (“1040000”,””)

This way we can launch the screen in different companies instead of object model. This one is alternate way to achieve this.

I got this information from Dynamics SL community members. Thanks to #Mark E #PatG

https://community.dynamics.com/sl/f/35/t/197629

Custom Quick Query Creation in Dynamics SL

In this blog, we are going to discuss about how to create the custom Quick Queries and how to add it into Dynamics SL. For this, we should do the following

  • Identify or Create an SQL Query View
  • Create a Base Query View
  • Add the Base Query View to the menu
  • Assign Access Rights to the Base Query View

Identify or Create an SQL Query View

  1. Create a custom SQL view as per your need in Application Database of Dynamics SL
  2. You ought to run the Synchronize All Ownership & Security update scenario on the Update Databases tab in Database Maintenance (98.290.00). This lets the SQL view appear as a choice for new Base Query Views in Quick Query Viewer (QQ.VIE.00).

Create a Base Query View

  • Log on to Microsoft Dynamics SL as the SYSADMIN user or as a user who has Update or larger access rights to Quick Query Viewer (QQ.VIE.00)
  • Click Administration
  • Under Maintenance, click Quick Query Viewer. Quick Query Viewer (QQ.VIE.00) appears. See the New button in the Menu as highlighted in yellow color If you open this screen as system Administrator.

QQ1

  • Click New button Select SQL View appears.

QQ2

  • Locate the SQL view that you want, and then click OK. The SQL view loads and the result set appears.
  • Click Expand button in the Quick Query viewer

Expandbutton

  • You will see the Add Filter option enabled once clicked the Expand button.

AddFilter

  • You can add the necessary filters to SQL view and click Save

SaveQuickQuery

  • In Base Query View Name, you have to specify a unique base query view name.
  • In Description, you have to specify the description that you want to appear in Quick Query Viewer (QQ.VIE.00).
  • In Related Business Module, you have to specify the module with which you want to associate the base query view.
  • Click to select Menu Item if you want to include this base query view in the menu system.
  • In Screen Number, you have to specify a unique screen number. This is the screen number to which you assign access rights.
  • In Company Filter, select one of the following values:
    1. None
    2. Current
    3. All
  • In Company Column, specify the name of the column that contains the company ID if you chose Current or All in step 11.
  • Finally you can click OK button.

Add the Base Query View to the menu

  • User has add the custom Quick Query into Quick Query Module as their wish.

Assign Access Rights to the Base Query View

  • User has to assign the proper access rights to the custom Quick Query screen using Access Rights Maintenance Screen(95.270.00)

Hope this blog explains about the Custom Query creation in Dynamics SL.

Quick Query feature in Microsoft Dynamics SL 2015

Microsoft Dynamics SL Vision with Perumalsamy

Microsoft introduced great bit of functionality in Dynamics SL 2015. One of the main functionality is the Quick Query with added new features included in Dynamics SL 2015.
Quick Query offers the users the ability to find data to answer questions, drill back into the product or to share the data by exporting it to Microsoft Excel.

With Dynamics SL 2015, the Grid to Excel feature with refreshable option and pivot tables in Quick Query has been enhanced. Now SL users no need to export the data again from SL system and user can do the refreshed over and over again through already exported excel. This is great bit of functionality in dynamics SL 2015.isn’t it?

Quick Query accessibility is now being expanded to the new web apps for Dynamics SL. This means Quick Queries can now be viewed on tablets and smartphones along with desktop machines

How can SL…

View original post 276 more words

Quick Query feature in Microsoft Dynamics SL 2015

Microsoft introduced great bit of functionality in Dynamics SL 2015. One of the main functionality is the Quick Query with added new features included in Dynamics SL 2015.
Quick Query offers the users the ability to find data to answer questions, drill back into the product or to share the data by exporting it to Microsoft Excel.

With Dynamics SL 2015, the Grid to Excel feature with refreshable option and pivot tables in Quick Query has been enhanced. Now SL users no need to export the data again from SL system and user can do the refreshed over and over again through already exported excel. This is great bit of functionality in dynamics SL 2015.isn’t it?

Quick Query accessibility is now being expanded to the new web apps for Dynamics SL. This means Quick Queries can now be viewed on tablets and smartphones along with desktop machines

How can SL user access this feature?

1.Go to Quick Query module and open any one of Quick Query

2.Click the Excel Icon on Quick Query menu

QQ1

3.Here you can pick your option as you wish.

4.If you want to use the refreshable excel, select the Query table.

5.System opens up the below screen

QQ4

6.You have to select the “filtered Rows” option for row filter and select the “selected columns” option to view the selected quick query columns in Excel.

7.You can use the All rows & All columns option if you want to see all rows and columns in Excel.

8.Click “Create” button and system opens up the refreshable Excel

QQ6

9.Excel has the refresh option in Design tab. You can use the “Refresh” option to make the refreshable excel. You can filter the data as your wish

10.You can get the latest updated information from SL using the “Refresh” Once you take the data from SL using Grid to Excel option. You don’t have to do the export the data again.

11.If you want to use the Pivot option, select the “Pivot table” functionality.

12.System opens up the below screen

qq2

13.You can pick the pivot table columns using the “Choose Pivot table Columns

14.Click “Create” button and system creates the Pivot table Excel

QQ7

15.You can get the latest updated information from SL using the “Refresh All” Once you take the data from SL using Grid to Excel option. You don’t have to do the export the data again.

It’s great bit of functionality included in Dynamics SL 2015.Stay tuned for other features in Dynamics SL 2015.

Dynamics SL 2015 features – PV Look up

Are you wondering what features are in store for the new release of Dynamics SL 2015 fall?  Here I’m going to discuss about one of feature in Dynamics SL 2015. The core feature of looking up data, found in most screens, has had a makeover. The same filter capabilities used in Quick Query to intuitively narrow your lookup options as you type now work for populating the possible values in all look up lists.

Now Dynamics SL 2015 is providing the option to filter the records as your wish. Here is sample PV Lookup from Dynamics SL 2015. You can see the filter right corner of PV Look up window.

blog1

How does it work?

You need to enter the value in “Type to Filter” control. The PV Look up window automatically filters the records based on the entered information. For instance, if you want to see the batch # contains the “61”, you have to enter “61” in Type to filter control and then system automatically filters the batch # that contains “61”. This feature is simply amazing. Isn’t it?

blog2

You can change the filters using below option. You can choose any filters that are available in combo box.

blog3

This is simple to use if you are already familiar with Quick Query.It’s simple enough to explain about PV Look up in Dynamics SL 2015!


Default Sales Person on Sales Order Entry in Dynamics SL

This blog post is just explaining the details about the default sales person in Sales Order Entry in Dynamics SL. We need to do the below steps to default the salesperson information on Sales Order in Dynamics SL.

1.Open the Accounts Receivable–>customer maintenance(08.260.00)

2.Select the customer in Customer Maintenance (08.260.00)

3.Go to the Order Management tab & Select the Default Ship To ID

p2

4.Save & Close the Customer Maintenance Screen.

5.Open the Account Receivable–> Shipping Address(08.262.00) screen


6.Select the Customer Id and Loads the Default site Id information on the Grid.

p3

7.Click the “Order Management “ button  and pops up the sub form “Order Management screen(08.262.01)”

p4

8.Click the “OM Customer Salespeople” button and opens up the “Salespeople by Shipping Address(40.809.00)” screen

p5

9.You need to define the Sales Person Id and commission percentage on the grid and save & close the screen.

If we have done with above setup, Salesperson Id is defaulted on the selection of customer Id in Sales Order screen.


Quick Query integration with customization Manager in Dynamics SL

I got one forum Question about the launching of Quick Query from standard screen customization during the button click event like custom report printing. I haven’t tried this before.

I just thought of using launch function to launch the Quick Query from standard screen. It’s working perfectly when launching the Quick Query Viewer using the launch functionality from standard screen. But one of forum mate has raised another scenario. The scenario is, if the customer wants to view the specific customized Quick Query directly from button click.

For better understanding,

If the customer customized & stored the Inventory Transaction – Quick query based on the Issues and Receipts & Tran Type. Now user wants to open the Inventory Transaction Quick Query for the Receipts. How can we handle this scenario on standard screen customization?

Please follow the below steps to call the Specific Quick Query from the standard customization.

For instance I am taking the Voucher & Adjustment Entry screen to explain this Quick Query Integration with customization manager.

  1. Open the Voucher & Adjustment Entry screen and Press (Ctrl + Alt + C) to initiate the customize mode.
  2. Press F6 to open up the insert object wizard (91.252.00) and add the button control from unbound control.
  3. Select the button which you added and press F7 to open the Visual Basic Editor.
  4. Add the below code in Button click event.

Dim ParmStr$

ParmStr = “QQVIE00.EXE ” + PRMSEP + “QQ_Apdoc”

serr1 = Launch(ParmStr, True, True, 0)

You can found the Quick Query view name in the QVCatalog table. This table is available in the system database.

This blog post explains about  launching the Quick Query from the standard screen itself.

Autocomplete Textbox in Dynamics SL

As Dynamics SL User, We always choose F3 or right Double click for the PV Lookup to select the specific data of any control in Dynamics SL. This PV Lookup functionality is very helpful to find the specific data on PV Lookup itself. We can also have search option by clicking the Header of PV Lookup to find specific data as user wants.

Now I have tried something different on my Custom Screen in Dynamics SL. I have used the Dot net Text box control to achieve the PV functionality using the Autocompletemode & Autocompletesource properties. These Textbox properties made the search operation very simpler and easy to select the specific data on my custom screen. Here no need to hit the F3 or right double clicks on Dynamics SL custom screen. You have to type the Character as your wish on textbox control and just displays the all the data which are specific to the typed character on Textbox control.

Please follow the below steps to achieve this Autocomplete functionality on Dynamics SL

  •  Include the Textbox (Dot Net control) from Tool box.
  • Change the Autocompletemode property as “Suggest”
  • Change the Autocompletesource proper as “CustomSource”

C2

  • Include the below code in custom screen of Dynamics SL.

Public Sub AutoCompletePV(ByVal table As String,ByVal txt As Object)

Dim SQlStr As String

Dim Csr_temp As Integer

txt.AutoCompleteCustomSource.Clear()

SQlStr = “Select * from “ & table

serr1 = SqlFetch1(Csr_temp, SQlStr, btable)

While serr1 <> NOTFOUND

txt.AutoCompleteCustomSource.Add(Trim(btable.fieldname))

serr1 = SFetch1(Csr_temp, btable)

End While

Call SqlFree(Csr_temp)

End Sub

For instance if you want to include this autocomplete functionality on Project Id field of custom screen, here btable should be the bPJPROJ & field name should be the Project.

  • Call this functionality in Form1_load

AutoCompletePV (“tablename”, TextBoxname)

c23

This functionality is only for custom screen of Dynamics SL. I am working on the same functionality in standard screen customization.

Customization Security in Dynamics SL

Every ERP organization is having different departments like finance, Inventory, Purchase & Human Resource etc. Each department is having their tasks to perform on daily basis. We as SL administrator need to provide the proper rights to every department. SL is having the access rights maintenance screen which is used to provide the access rights to every department by user wise and Group wise.

Microsoft Dynamics SL provides the security features by providing the sufficient access rights to the users.  This security feature is used to protect our customization from unauthorized access.

We are going to discuss about the security of Microsoft Dynamics SL in this post.

Steps to customize the standard screen with locking feature.

  • Go to Customize mode on contract maintenance screen.
  • Press F7 to Visual Basic for Application Editor
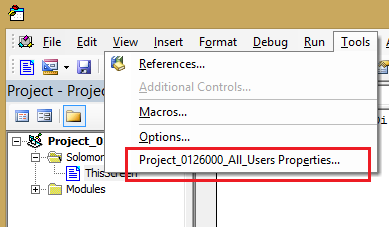
  • Go to Tools option and select the Project Properties

s2

  • Project Properties screen pops up and go to the protection tab.

s23

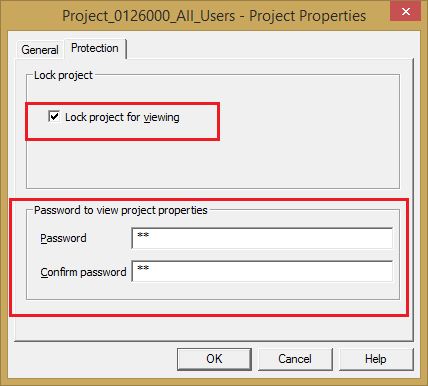
  • Checked the Lock project for viewing
  • Set the password and confirm password option to protect the customization with password.
  • Save the customization and reopen the screen.

We can do the customization with simple code. We have to write the code in Form Load event to protect the customization with password.

Private Sub Form1_Load()

Dim Security$, MessPrompt$, MessTitle$, Password$

Password = “test”

MessPrompt = “Enter password to open screen.”

MessTitle = “Password Required.”

Security = PasswordBox$(MessPrompt, MessTitle)

If Trim$(Security) <> “” Then

If LCase(Security) <> Password Then

MsgBox “Invalid Password.”, vbOKOnly, MessTitle

retval = ErrNoMess

Call Edit_Close

End If

Else

MsgBox “Password is required to open this screen.”, vbOKOnly, MessTitle

retval = ErrNoMess

Call Edit_Close

End If

End Sub

Also we’ll need to add a “VBATool_VBA” code module with the following code:

Public Declare Function PasswordBox Lib “sbltovba.dll” (ByVal szPrompt As String, Optional ByVal szTitle As String, Optional ByVal szDefault As String, Optional ByVal xPos As Long = -1, Optional ByVal yPos As Long = -1) As String

Public Declare Function GetField Lib “sbltovba.dll” (ByVal szString As String, ByVal iFieldNum As Integer, ByVal szSepChars As String) As String

Public Declare Function SetField Lib “sbltovba.dll” (ByVal szString As String, ByVal iFieldNum As Integer, ByVal szField As String, ByVal szSepChars As String) As String

Public Declare Function GetAccelerator Lib “sbltovba.dll” (ByVal szString As String) As String

Public Declare Function GetCaption Lib “sbltovba.dll” (ByVal szString As String) As String

Public Declare Function ConvertX Lib “sbltovba.dll” (ByVal xVal As Long, Optional ByVal lFlag As Long = 0) As Long

Public Declare Function ConvertY Lib “sbltovba.dll” (ByVal yVal As Long, Optional ByVal lFlag As Long = 0) As Long

Public Declare Function Clipboard_GetText Lib “sbltovba.dll” () As String

Public Declare Sub Clipboard_SetText Lib “sbltovba.dll” (ByVal szString As String)

Public Declare Function Clipboard_Clear Lib “sbltovba.dll” () As Boolean

Public Declare Function Clipboard_GetFormat Lib “sbltovba.dll” (ByVal iFormat As Integer) As Boolean.

The source code has given by Mark Ehelben who is my forum mate. He is the person who gave the work around on my issue. Thanks to Mark Ehelben.This post will be useful to developers who is working in Dynamics SL.

Features of purchasing module in Dynamics SL 2011

There are many features released on Dynamics SL 2011.In this post, we are going to discuss about the simple features on purchasing module which may add the value to the users who are all using Dynamics SL 2011.

Receipt/Invoice Entry:

This screen is used to enter the one-step entry of both the receipt and vendor invoice (voucher) information. Two important features in Receipt/Invoice Entry screen as highlighted in Red color box.

Create Voucher for Receipt

By default this option is checked while entering the receipts against the purchase orders. This Check box indicates that a voucher document is created in Accounts Payable if it’s checked otherwise it won’t create voucher on Accounts payable module.

Exclude Freight from Discount

If you do not want to include the freight charges in vendors discount calculations, this check box has to be checked. This option is also available on Default tab of vendor maintenance screen where we can set this for individual vendors.

 slRe

PO Setup:

Allow Multiple PO to one Receipt

Select this check box if you want to receive against one or more purchase orders for a single vendor under one receipt.

Inventory Cross Reference

Check the Auto Add Alternate IDs for Inventory Items indicates that Item Cross References (10.380.00) is to be updated automatically if an alternate ID is entered on a purchase order, item request, or requisition. This is true only if the Inventory module is installed.

You can select the different type on the drop down which specifies the category designation that will be applied when users enter an Alternate ID.

If Auto Add Alternate IDs for Inventory Items is checked, Purchasing will automatically enter the Alternate ID and Alternate ID Type to the Item Cross References (10.380.00) as purchase orders are entered. This is true only if the Inventory module is installed.

Reopen Closed Purchase Orders on Return

If you check this check box as true, the system will reopen the purchase order on Return even if closed already

Create AD from Return

Click the check box if you want the return to create an AD document in Accounts Payable when processed.

slre1

This post may helpful to understand the features of Dynamics SL.